Learn how to control certain elements of your map, including camera, monsters and even players to create cutscenes.1. Make sure you have created room with light and info_player_start. 1. For checking animation list for each monster you will need Half Life Model Viewer.
Camera View Control
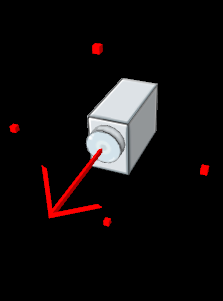 Control player view, include camera movement and simple player control. Camera movement requires basic path_corner usage knowledge. Control player view, include camera movement and simple player control. Camera movement requires basic path_corner usage knowledge.
1. You can control player view in many ways. Camera can be static, or travel among specified path. Every trigger_camera need a target to look at.
2. Place trigger_camera on the map. Trigger_camera angles determines the direction of view.
3. Setting up flags and keyvalues are very important in this entity. Every single setting may change how camera works significantly.
4. keyvalues:
target --> important value. If target is set, it will override camera angles, so trigger_camera will face this specified entity. Info_target may be used for this.
name --> required to activate a camera by triggering it.
hold time --> how long camera controls player view, in seconds.
initial speed --> camera movement speed (units per second).
camera rotation speed --> rotation speed, degrees per second.
path corner --> required to make camera move. Its a name of the first path_corner entity where camera starts it's movement on activation.
How to set up path corners? Check subsections from 5 to 8 in the Train- More Advanced Platform section.
5. "flags" tab:
start at player --> camera will start at player position, after that it will gradually switch to path_corner route.
If no path_corner specified, the camera will move at the direction that player was looking at, and it won't stop until
hold time reach it's limit.
follow player --> camera takes player as a target.
freeze player --> players can't move until end of camera view.
all players --> all players on the map will be affected by camera view control.
force view --> lock a trigger_camera view whenever player is dead or not.
instant turn --> camera turns instantly within specified path.
instant move --> camera moves instantly within specified path.
mouse cursor --> enable mouse pointer and mouse button features.
player invulnerable --> players won't take any damage from environment.
6. Now activate the camera by triggering it's name e.g. by trigger_once, multi_manager, func_button e.t.c.
Monsters Control- Animation and Movement
You can override default AI of monsters, so they can perform actions like talking, walking, running, jumping, teleporting e.t.c.
U can control their movement and animation.
1. Place scripted_sequence or aiscripted_sequence on the map.
Differences between scripted_sequence and aiscripted_sentence:
| scripted_sequence | aiscripted_sequence | - can be configured to not
be interrupted even when attempting to kill actor - more AI and animation movement control
- allows both action and idle
animation to be set
| - cannot be interrupted
unless actor dies - ability to set monster to attentive state after finish
- allows action animation
to be set
|
2. You can affect monsters directly (by monster name) or by radius around sequence entity (by monster classname). In both cases you can optionally force affected actors to turn, move, run or teleport to this sequence entity.
3. Put monster(s) on the map, name them (if using monster name) or make sure monsters with classname specified
in sequence entity target monster are able to reach specified search radius (if using monster type- classname).
4. Both scripted_sequence and aiscripted_sequence requires to be triggered to perform action animation and other entity functions. Idle animation will be played before triggering scripted_sequence. Idle animation is looped.
5. Customize keyvalues to suit your needs:
name --> required to activate animation (and play idle animation).
target --> entity to trigger after end of sequence. Set it to another scripted_sequence or aiscripted_sequence for easy
animation chaining.
delay before trigger --> delay in seconds, before triggering another entity.
kill target --> entity to destroy after end of sequence.
target monster --> name or classname of monster to set specified animation. Only one monster can be affected at time.
action animation --> name of animation to perform. See Browsing, Choosing and Positioning Animation section below.
Action animation with "walk" move to position keyvalue setting.
idle animation --> name of looped animation to play before activation-scripted_sequence only. See Browsing, Choosing and Positioning Animation section below.
Idle animation
search radius --> if using monster classname, the search radius of sequence entity from which monster will be picked.
Action animation starts when specified monster reach this radius (disable directly triggering*). Set it to 0 to disable.
repeat rate --> if using monster classname, it's a search intervals when search radius is used.
move to position --> determines monster movement at sequence start. Moving to position stops idle animation. Instantaneous movement may break affected monster AI permanently, when using idle and/or action animation.
"No- Turn to Face" option cannot be used with both "action animation" and "idle animation" or idle animation won't stop playing when triggering this entity.
move to radius --> if using monster classname, locks monster position at sequence entity radius (specified in search radius).
ai schedule when done --> set AI behavior after end of sequence- aiscripted_sequence only.
6. Configure flags in "flags" tab:
repeatable --> allow this scripted entity to be triggered again.
leave corpse --> prevent corpse model from disappearing (works only if action animation is a dead-specific animation).
no interruptions --> actor won't die or stop it's animation until end of script.
override ai --> disable default AI during the script.
no script movement --> normally some animation like jumping, dashing, falling e.t.c. are changing monster position. Select
it when you want monster to stay on it's position after sequence is over.
no reset entity --> don't reset monster animation at the end of script. Gives smoother animation transition between specified animation and default monster animation. However it's recommended to not using this flag.
7. Animation is ready now. Depending on trigger and/or selected action/idle animation the event will look like this:
| Specified animations: | On monster spawn: | After triggering (ai)scripted_sequence entity: | | Idle animation only | Loop idle animation | Stop idle animation | | Action animation only | Do nothing | Play action animation once | | Both idle and action animations | Loop Idle Animation | Stop idle animation and play action animation |
Move to position should be set to "No" to make animation behave as presented above.
You can use sentences for monster routing instead of path_corners. It is possible to loop any type of animation
by self-targeting sequence entity.
Removing scripted entity (by kill-targeting it) is the only reliable way to stop action animation.
*Name is no longer required. Entity activate itself when radius is reached.
Browsing, Choosing and Positioning Animation.
This small guide will explain you how to check monster animations, preview them in Valve Hammer Editor, and how to set position of scripted_sequence/aiscripted_sentence to make animation appear in a place we really want to. Check this tutorial
if your monsters are inside of wall/floor or when they're floating while performing animation.
1. Viewing animation. To view all animations on your monsters, you will need a Half Life Model Viewer or Jed's Model Viewer.
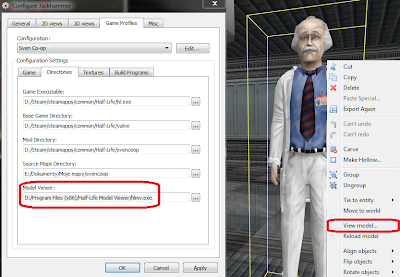
If you own Jackhammer you can assign model viewer to it in options, so you can preview any model file from editor level:
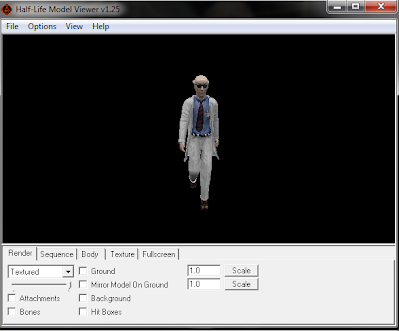
If you're using old version of Jackhammer or Valve Hammer Editor you will need to open a model from "/models" folder manually with Half Life Model Viewer OR you can check visual model list and find desired monster there. The model viewer window should look like this:
I'm not going to explain you all functions of model viewer. For now we only need to go into "sequence" tab. Here you can check
all the sequence names. E.g. I'll chose 'covering_in_corner' animation name. Sequence name from this list is the exact string you need to type in "idle or action animation", so for my 'covering_in_corner' animation, idle animation of (ai)scripted_sequence
is set to 'covering_in_corner'.
2. Applying animation You know how to choose your animation. Write name of animation into action animation
(single animation plays when (ai)scripted_sequence is triggered) or idle animation (animation is playing looped before (ai)scripted_sequence is triggered), or different animations for both. Remember to set target monster. The animation should
work now, remember to check "Monsters Control- Animation and Movement" section above for all flags and keyvalues
of this entity. We have not finished yet, you need to set a position and angles of your animation.
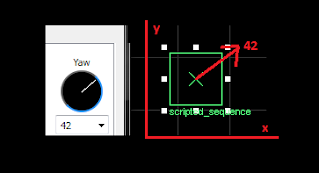
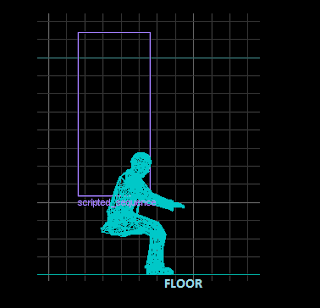
3. Positioning animation The easiest think is monster angle- when animation is enabled, the monster's Z angle is set
to sequence angle:
The only difficulty is model's position. For animations like 'walk' or 'run' there is nothing to check- origin of animation
is at the floor level, just like origin of (a)scripted_sequence. But some animations have their origin moved to other location.
For editor preview of exact position of animation we will use Animation sequence (editor) keyvalue.
Firstly spawn completely new monster. It will be used only for measurement. I'll use 'sitting3' animation in this example.
Now in the Animation sequence (editor) type a number of sequence. Some monsters like monster_scientist allows mapper
to choose animation name instead of number. But monster like monster_houndeye need a animation number to be specified-
in that case, go into animation sequence list in model viewer, and count a number of sequence by yourself. First sequence
in the list is sequence number '0' (walk), so 'sitting3' is number '75' e.t.c.
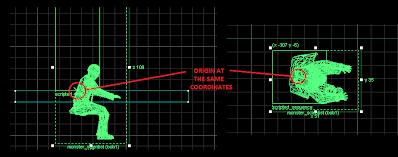
When sequence is chosen, the preview will be generated in editor. Move monster to the location of (ai)scripted_sequence,
make monster's origin overlapping with origin of sequence entity.
Preview before relocation:
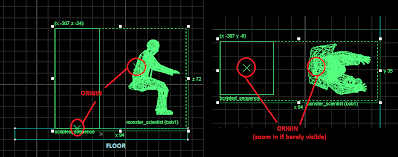 Preview after relocation, origins overlapping: Preview after relocation, origins overlapping:
Now move both model and sequence entity to desired location. I'll move scientist above the floor so he won't be stuck in it:
You can delete measurement monster now (not the one you attached to (ai)scripted_sequence). Now monster animation will
be spawned at sequence entity's origin. The positioning has been completed.
Monsters Control- Sentences
 It's possible to make NPCs speak any sound file.
1. Place scripted_sentence on the map.
2. Whenever sentence is activated the actor "speaks" specified sound file or sentence from default_sentences.txt file. Currently for custom sounds it's easier to specify .wav file directly.
3. Change keyvalues settings:
name --> if specified, sentence will need to be activated instead of being enabled at map start.
target --> entity to trigger after sentence ends.
delay before trigger --> delay in seconds, before triggering another entity.
kill target --> entity to destroy after end of sentence.
sentence name --> name of sentence to run OR sound file to play. Lip syncing is automatic when choosing sound file.
speaker type --> name or classname of monster to set specified sentence. Only one monster can be affected at time.
sentence time --> duration of monster speaking, in seconds. Best value is a sound file duration.
search radius --> if using monster classname, the search radius of sentence entity from which monster will be picked.
Sentence will be triggered when specified monster reach this radius (disable direct triggering*). Set it to 0 to disable.
delay before refire --> time to play sentence again when sentence is looped. Specifying name disables this feature.
listener type --> monster will "talk" to this entity.
4. Set the flags of sentence entity:
fire once --> can be activated only once.
followers only --> speak only if this monster is following player.
interrupt speech --> override current speech on affected monster (including default ones). Still some monsters interactions
can break this sentence.
concurrent --> this sentence cannot be played among other sentences (pick random sentence from those which are called at the moment). Also override any other sentences (like interrupt speech but works globally) except default sentences of other monsters.
5. It's possible to trigger sentence when using/un-using allies to follow you. To do so go into monster's use sentence
or un-use sentence and specify name of scripted_sentence you wish to use.
*Name is no longer required. Entity activate itself when radius is reached.
Monsters Control- Spawning
U can spawn single monster or create an active spawner that delivers monsters temporarily.
If you'd like to create spawner similar to half-life xen teleportation effect (i.e. laser beams, lights and with laser spawning sounds) go to section: Xen Teleportation Spawn Effect in special effect tutorials (bottom of page). Xenmaker effects can be retrieved by squadmaker.
1. Place squadmaker on the map. You can use monstermaker instead, but it's lacks some features.
Differences between monstermaker and squadmaker:
| monstermaker | squadmaker | - spawn single/multiple monster(s) with optional spawn delay
- set custom health
- set destination on spawn
- set name of monster for future triggering
- specify if monster is player ally or not
| - all monstermaker features
- special area of spawning settings
- full monster customization
- set weapons (for male assassins and grunts)
- creating squads
- can copy xenmaker effects setting (beams and sounds)
|
2. Customize keyvalues (monstermaker and squadmaker):
Monstermaker:
name --> required to activate a spawner by triggering it (if it's disabled on start).
target on release --> entity to trigger after monster spawns.
monster type--> classname of monster to spawn, e.g. monster_barney. Can't be empty unless you wish to crash the game.childrens name--> name of spawned monsters, can be empty. You can freely trigger named monsters.
monster count--> total amount of monster that spawner holds.
make player allys--> It not makes spawned monsters player's ally, it's just revert it's disposition to player. NO means leave default disposition to player, YES means revert it. So if you want to spawn Barnabus you need to set it to YES.
frequency--> delay between spawns.
max live children--> maximum number of living monsters.
custom health--> overrides monster health.
goal entity--> it supposed to make monsters try to reach specified entity after spawn, however it doesn't seems to work.
Squadmaker:
name --> required to activate a spawner by triggering it (if it's disabled on start).
classification -->switch spawned monster two-way relationship to other living entities to be the same as chosen monster type.
target on release --> entity to trigger after monster spawns.
monster type --> classname of monster to spawn, e.g. monster_barney. Can't be empty unless you wish to crash the game.
It's possible to set it to item or weapon classname.
childrens name --> name of spawned monsters, can be empty. You can freely trigger named monsters.
monster count --> total amount of monster that spawner holds.
delay between spawns --> self-explanatory.
max live children --> maximum number of living monsters.
blocked spawn handling --> determines how monsters behave when spawning process meet irregular conditions,
the options are:
legacy- don't spawn until spawner area gets unblocked.
block- don't spawn until spawner area gets unblocked, ignore delay
between spawns flag, spawn monsters as soon as possible.
force spawn- force spawn whenever spawner area is obstructed or not. amount of telefrag damage --> damage done to all entities that are blocking monster from spawning.
trigger target --> target to fire after trigger condition is met.
trigger condition --> special condition to be met to fire trigger target (e.g. trigger something when monster is below
50% health).
body --> body submodel override.
is player ally --> It not makes spawned monsters player's ally, it's just revert it's disposition to player. NO means leave default disposition to player, YES means revert it. So if you want to spawn Barnabus you need to set it to YES.
override render mode --> if set to YES, monsters are affected by render mode, render fx, fx amount and fx color settings of this squadmaker.
xenmaker template name --> name of env_xenmaker entity to copy teleportation spawn effect.
not solid --> if set to YES, monsters can be passed through.
gag --> if set to YES, monsters starts without making any idle sounds.
weapons --> set weapon of the monster. Used for human monsters.
squad name --> name of the virtual squad. All monsters with the same squad name bravely cooperates to deal with enemy.
squad leader --> if set to YES, monster becomes a leader of currently assigned squad. Squad leader is priority for all squad members, they will try to protect him. When squad members gets injured, they try to get back to leader where they can regenerate their health at idle state. Squad leaders can communicate between themselves. All monsters are following their squad leader, if they are out of combat.
in-game name --> overrides monster name shown on hud (if monster detailed info is enabled in map config file- on by default).
blood color --> overrides monster blood color.
custom health --> overrides monster health.
custom model --> overrides monster model. Destination model should contains identical animations as source model. Learn here about replacements*.
custom min hull size --> overrides minimal monster collision bounding box.
custom max hull size --> overrides maximal monster collision bounding box.
sound replacement file --> path to replacement file. Learn here about replacements*.
monster roaming --> decide if monster is using info_nodes path finding or not.
goal entity --> it supposed to make monsters try to reach specified entity after spawn, however it doesn't seems to work.
entity to guard --> spawned monsters will follow specified entity, and eventuallytry to reach it if it's not nearby.
v_model --> overrides monster 'view' weapon model. Learn here about replacements*.
w_model --> overrides monster 'weapon' weapon model. Learn here about replacements*.
p_model --> overrides monster 'player' weapon model. Learn here about replacements*.
3. Change flags settings in the "flags" tab:
start on --> spanner is enabled at map start.
cyclic --> spawn single a monster each time it's triggered. Ignore delay between spawns keyvalue.
monster clip --> is selected, spawned monsters will be affected by func_monsterclip entity.
prisoner --> makes spawned monster not attacking anyone. Other entities ignores prisoned monster as well.
auto size bbox --> spawning area is resized to monster's actual size, helpful flag that may prevent from stuck-spawning.
cyclic backlog --> when spawner is cyclic this option makes monster wait to be spawned in a case the spawner was blocked when it was triggered. Check this option if you want to spawn monster even when spawner was obstructed- as soon as spawn area gets free the monster spawns. Multiple monsters can be queued that way.
wait for script --> monster thinking is disabled until scripted_sequence or ai_scripted_sequence takes control over it.
no respawn --> disable respawn if monster type is an item.
4. If start on flag isn't selected, you need to trigger this entity in order to enable it (or in order to spawn single monster- if cyclic flag is selected).
One spawner can spawn only one monster at time, if you need to spawn a group of enemies you'll simply need to put more spawners on your map and name them with the same name.
*work in progress.
Monster/Player Control- Traveling, Attacking e.t.c.
How to make monster walking or flying around your map. How to prevent monsters from going into undesirable areas.
0. Before you make your monster walking/flying, you will need to put some info_nodes on your map. Those are navigation point for monsters, they don't need any setup, it's only recommended to rise node origins from a ground, so they will hover above it instead of touching it. For flying monsters use info_node_air instead. You can find more information about nodes here:
Sven Co-op Entity Guide- info_node
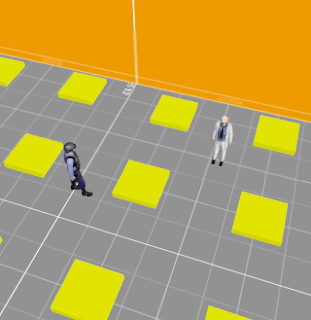 Example of nodes placement. Example of nodes placement.
1. Traveling: There's many ways to make monster travel on your map:
Method One
By using scripted_sequence (or aiscripted_sequence) with empty animation fields. Use move to position keyvalue to determine how monster should get to it- walk run or even teleport (instantaneous). Monster will stop route when he is attacked, unless you checkno interruptions flag or if you used ai_scripted_sequence instead of scripted_sequenced (in second case the monster cannot be killed). You can loop route by targeting first waypoint in a last waypoint:
Make sure repeatable flag is selected in every sequence entity or monster won't repeat his route. Target monster need
to be set in every sequence element. Now trigger any of those sequences to start monster traveling. Use trigger_auto
if you want movement to work at map start.
Method Two
By spawning monster with entity to protect set, monster will travel to specified entity and follow it if entity is movable.
Method Three
By setting up path_corner entities. After map start the monster may go to path_corner written in a monster's target field.
Route can be interrupted. Path corners needs to be connected to each other in a similar way that sequenced need to be:
 How to set up path corners? Check subsections from 5 to 8 in the Train- More Advanced Platform section.
2. Attacking Thinks: Make monsters attacking certain objects in your map.
Attack Player / Don't Attack Player
By reversing is player ally/makes player ally keyvalue, where "NO" means default relation to player, and "YES" means reverse relation to player. So if you want monster_barney to attack you, you need to set it to "YES", and if you want friendly headcrab pet, you need to set headcrab's is player ally/makes player ally to "YES".
Attack / Don't Attack anyone/anything including: Monsters, Players, Breakables, Pushables, Door, Buttons
Changing classification keyvalue in any of those entity changing it's two-way relations, so you can change classification of func_breakable (glass for example) to "human military", so monster_barney or other player allies and aliens would attack this glass until it breaks. Changing class is very easy way to switch monster fraction. You want zombies to be part of the military soldiers army? You got it. Or maybe you want bullsquid to be scared of you- change it's class to "insect"!
Check monster relation table to see how they act to each other:
Sven Co-op Entity Guide- monster class relation table
Dynamically change monster realation/class
To change class in real time (e.g. by trigger) you need to put entity called trigger_change_class. Set it's target to monster name, choose classification. Now you need to trigger this entity to immediately change targeted monster classification. Done!
It's possible to change player class, so environment would treat player differently depending on chosen classification.
3. Kill/Damage monsters/player:
Method One
You can create a trigger that hurts monsters when they enter it's volume. Tie brush covered with "AAATRIGGER" texture into trigger_hurt entity. Trigger_hurt can trigger entities like regular trigger.
1. customize keyvalues:
name --> required to turn trigger_hurt on/off.
target --> name of the entity to trigger.
master --> name of multisource entity that locks this entity.
damage --> damage to deal each moment. Damage interval cannot be customized.
delay before trigger --> delay before trigger target.
damage type --> used for HUD info icon, determines which damage icon appears when player is taking damage from trigger.
How to set up path corners? Check subsections from 5 to 8 in the Train- More Advanced Platform section.
2. customize flags:
target once --> trigger target only once.
start off --> this entity need to be enabled by triggering it in order to work.
no clients--> entity ignores players.
fire client only --> only player activates trigger.
touch client only --> only player takes damage.
Method Two
It's possible to damage monsters through more advanced trigger_hurt variant. Trigger_hurt_remote is a highly customizable point entity. Put it on your map. It need to be activated by trigger unless start on flag is selected.
1. customize keyvalues:
name --> required to activate/deactivate entity.
target --> entity to hurt.
target class --> if specified, all entities with given class will be damaged.
damage --> damage to deal.
armor damage --> armor damage to deal, works only when do armor flag is selected.
delay --> time interval between damaging, when constant flag is checked.
damage type --> used for HUD info icon, determines which damage icon appears when player is taking damage from trigger.
2. customize flags:
instant kill --> kill the target when entity is activated.
constant --> the damage will be applied constantly instead of once.
start on --> deal the damage/enable constant damaging on map start.
do armor --> you can use armor damage.
|


