Placing the light on your map is just a beginning of lightning control- professional tricks and using special compile commands greatly improves lightning quality of your map. Control shadows, smoothing, light bouncing and many other parameters of lights by using ZHLT and Vluzacn's commands, entities and keyvalues (I'm using only Vluzacn's tools for this tutorials).
You will also learn some cool tricks, not only light related. You can check ZHLT documentation (that are used also in Vluzacn's tools) here: ZHLT. 1. Create map, place light on it, or use already existing map for this tutorial. Some tricks and tutorials requires involving specially created/customized brushes and entities. Don't forget to place info_player_deathmatch!
Compile Commands and Processes
First think you need to know is that using compile commands controls the most important parameters of map lightning. Pick those command depending on your needs, note that testing map wouldn't require most of light commands- that only takes more time, when you just want to test your map you shouldn't bother about lightning until final compiling. When map is ready for release, use as much commands as you need, increase details of light and shadows, you can also control compile process window to show more details about whole process.
1. The whole compile process can be split into four programs that builds your map:
hlCSG.exe- turns brushes into polygons, build collision of the map, creates four .hull files for hlBSP.exe.
hlBSP.exe- build a map up, making all entities usable. Map file is ready but brushes are still invisible.
hlVIS.exe- makes map visible, calculates what player can see and what cannot, rendering only surfaces seen by player. Light is still not provided, but textures itself are visible.
hlRAD.exe- creates lightmaps.
2. Each of compile programs have it's own command list, also some of the commands are shared in every process. You can check ZHLT documentation here: ZHLT. In this tutorial only some of those commands will be used, to visually show how they're affecting your map. Commands can be specified in advanced compile windows.
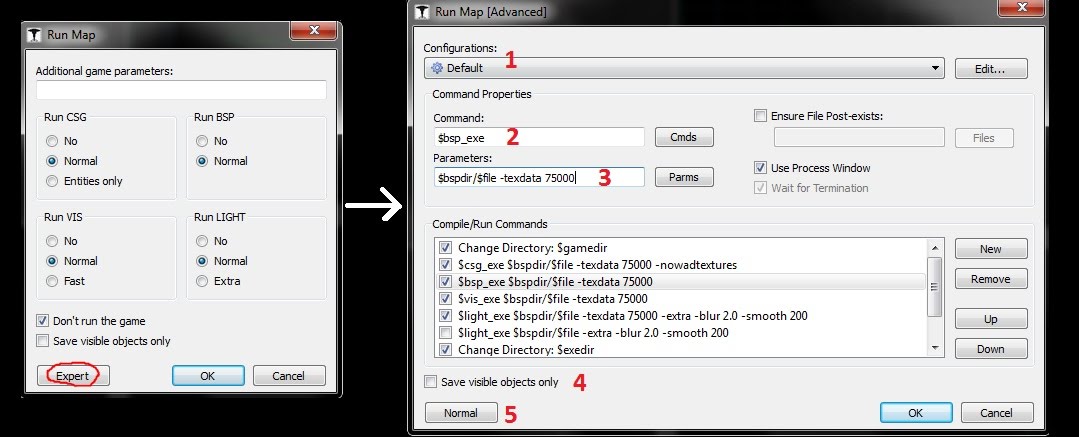
Click at  icon (Run map), and the press advanced button for advanced process window. icon (Run map), and the press advanced button for advanced process window. Here you can customize all compile parameters and options:
A short description about this window settings:
- Configuration preset to use, you can save multiple configuration for each game or compile type.
- Command, should be left as it is.
Command parameter textbox, all parameters will be typed here, just choose a process from Compile/Run Commands list and then write parameter, "-" symbol for new parameter with (optional) number. The last command is run command: If you disable it, the game won't start after compiling. It works in same way as checkbox "Don't run the game"
in standard "Run game" window. - If selected, only visible brushes are compiled- all hidden brushes (by editor's hiding visgroup function) will be ignored.
- Use this button to return to normal compile window.
3. Below is the list of compile command you can use. Orange are for hlCSG only, green for hlBSP.exe, blue for hlVIS.exe,
and purple for hlRAD. Pink command can be used in multiple compilers. Gray commands are used by Ripent program.
*NOTE: in newest version of Sven Co-op compile parameters can be set through entity: info_compile_parameters.
-lightdata #MB : custom maximum lightning data (in MB) to be used in each tool (e.g. '5MB'). Drastically decreases performance but may fix compile error caused by exceeded lightning data.
-texdata # : you may want to increase texture memory limit by specifying a value here (e.g. 60000 or more depends on your needs), fear not doing this while we already have 2015 year when PC's and expanded GoldSrc engine should handle this
w/o problems. Also it's required when you map exceeded this limit, which is easy to do in large maps.
-onlyents : compile only entities, used when you made only minor changes to entities.
-nowadtextures : force compiler to pack all textures into .bsp file. It is really useful feature, but may cause .bsp file sending
error trough server->client if .bsp file is too big.
-wadautodetect : if using .wad files, this tells compiler to not including .wad files, that are not used by this map at all.
-maxnodesize # : advanced feature that allows you to control maximum portal node size. Smaller values = smaller chunks
of portal nodes = higher r_speed values = faster/more accurate vis in certain situations.
-cliptype <type> : default is 'legacy', you can override it by using other clip method, all settings may affect compilation speed:
- legacy: fast with old clipping style.
- smallest: very fast, but not precise, may cause bad clipping in some areas.
- normalized: removes "denormalized" brushes.
- simple: faster, moves clip a few units upward on sloped surfaces.
- precise: using newest clip hull generating method, very precise. It is fixed by Vluzacn's, but using it is still not needed.
-low | -high : priority in which compiler will be run at. Use 'low' if you want to freely use your computer during process.
-threads # : amount of computer processor threads to be used for each compile tool (e.g. 2 or 4). Number of threads is sometimes detected manually, however if it isn't, or you are not sure, always use this command. You can check number of threads used in compile process window:
-noskyclip : disables default feature that makes all "sky" texture clip players (but no monsters).
-fast -full : determines HLvis compilation method (e.g. use '-fast' for testing- poor optimization but fast compile, and '-full' for good optimization and slower compiling).
-extra : turns special HLrad.exe compiling, what makes all light look much better. Generally used for final compilling, but every other light commands below are used with -extra parameter, so it's recommended to use it as well for best comparison.
 -smooth # : controls texture smoothing at neighbor surfaces joined with each other at different angles (in degrees), more values for more smoothing, less values for sharper edges. Imagine a cylinder that have 6 sides, and the cylinder with 12 sides. The second one will have it's faces smoothed more that the first one. That's because smoothing angle is set to a single value, that determines degrees tolerance for angled (to each other) faces. Increasing this value makes highly angled faces
to be smoothed. By default smoothing is already high, but still you can increase/decrease this value for you needs.
 -smooth2 # : works exactly in the same way as '-smooth', but designed for neighbor faces textured differently.
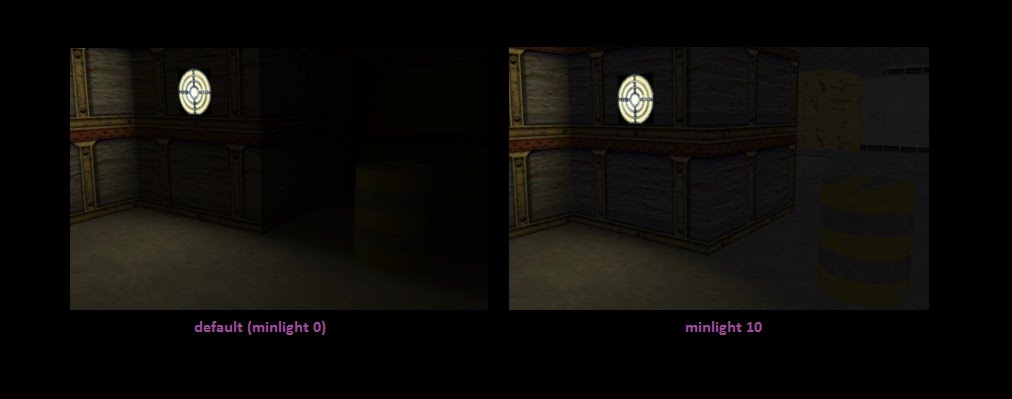
-minlight # : use to determine minimal lightning level for this map, in a range from 0 to 255. Lightmaps darker than this value are raised to minimum level. Try to keep this value low, or your map will be too bright.
-maxlight # : same as above, but caps maximum light value. Brightness of lightmaps above this value are decreased to maximum level. Try to keep this value high if you don't want your map to be too dark.
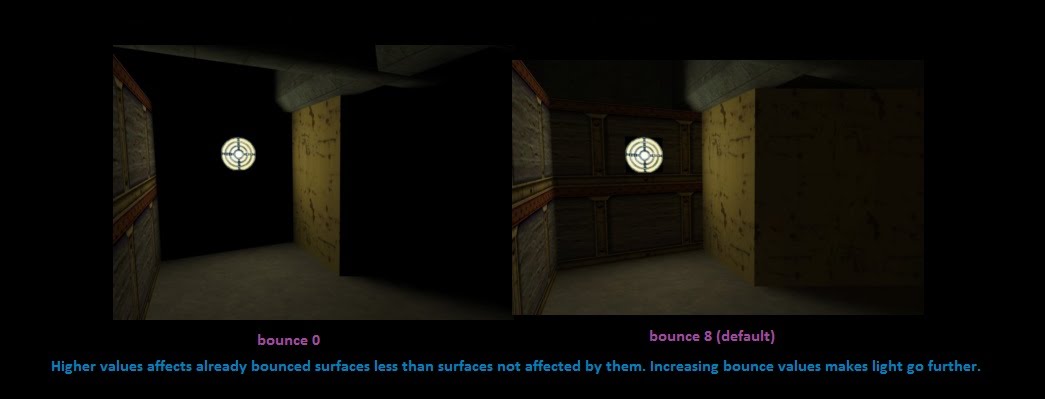
-bounce # : light bouncing amount. Firstly, it helps to light up dark areas by bouncing a light further to spots where there is no light source to lit the environment. Secondly, provides softer shadows. You should always use this command because it's making map look way more natural. The color of the textures determines the color of bounced light. By default, light bounces 8 times.
-maxlight # : same as above, but caps maximum light value. Brightness of lightmaps above this value are decreased to maximum level. Try to keep this value high if you don't want your map to be too dark.
-blur # : controls shadow sharpness. The higher value is, the more blurred and less blocky shadows are. Default 1.5. Values below 1.0 does not work.
-scale # : scales the global lightning with this value. All lights are affected by this. If you final map need a little more light, increase this value. Also you can specify lower values. Default 1.0, 0.5 makes lights brightness 2X lower, 1.3 makes light 30% stronger e.t.c.
-dscale # : same as above, but scales direct lightning only (point light entity).
-noskyfix : disables single light_environment usage for all skies in the map, so each area requires it's own light_environment. Activating this command disallows to have more than one light_environment in single area (only one will be used).
-gamma # : gamma scale for your map that affects all lightmaps. 0.55 for default gamma.
-fade # : global lightning fading. Keep in mind that most lightning entities have it's own "ZHLT Fade" keyvalue, which overrides global settings. You would need to leave that keyvalue empty in order to use global parameter.
 -estimate : shows estimated time during each compiler.
-chart : displays .bsp file statistic after each process.
-wadinclude <file>.wad : it's possible to include .wad files into bsp. manually with this command. Each .wad file requires another duplicate of that command (e.g. '-wadinclude reytext01.wad -wadinclude reytex02.wad -wadinclude opfor.wad' e.t.c.).
Other Vluzacn's parameters:
-softsky 0|1 : makes better light_environment diffusion (specially from exterior to interior areas). Enabled by default (1).
-nolightopt 0|1 : removes light duplicates to save memory (if set to 0). Disabled by default (0).
-noinsidefill : disable automatic empty areas filling. Normally, the empty areas where there is no single entitiy are filled just like
it would be a brush in a place of that area. This command disabling it, making empty area exist after compiling.
-texreflectscale # : normally, the bounced light brightness depends on texture of the surface from which this light is bouncing. It's set to 0.7 by default, and it's fully customizable by parameter of this command.
-textreflectgamma # : normally, the surface hit by bounced light has gamma value dependent on that light. It is set to 1.76
by default, and can be customized by this command.
-blockopaque 1|0 : by default it's set to 1. Disabling it stop preventing black areas on opaque entities from leaking out.
-depth # : controls thickness tolerance of the walls whose are affected by info_translucent entity.
-wadcfgfile <file>.txt : allows to choose wad config file to use. It is obsolete when using Jackhammer instead of Hammer Editor.
-parse, -import, -export : used by Ripent. From Sven Co-op forums:
Disable the export and import of texture data of ripent by default.
Because if the texture data of a map has changed, you will not be admitted when joining a server running with the original map.
And ripent may cause existing wad files to be overwritten when exporting the wad file. To enable it, use the '-texture' parameter together with '-export' or '-import'.
-textureparse, -textureimport, -textureexport : used by Ripent. From Sven Co-op forums:
Changed ripent's texture function to having a seperated set of parameters.
Use '-textureexport' or '-textureimport' to extract or update textures in the bsp file.
Use '-textureparse' at the same time to switch to the more friendly output format.
-nobrink : disables feature that fixes brinks error. You need to have strong reasons for disabling it.
-noclipnodemerge : when used, disables clipnode merging, which increased clipnodes memory.
-noemittedrange : disables fixed related to texture lightning and dark corners.
-drawoverload : shows overly bright spot produced by light entities. From Sven Co-op forums:
Added the feature of preserving lightmap color of overly bright spots.
Because the maximum brightness value that can be stored in the lightmap is limited to 255, we have the problem of how to handle the overly bright spots.Previously, the brightness that exceeds the limit is simply clipped by maximum value, in R,G,B channels separately. And Goldsrc engine does this too when rendering the lightmap, and with a even smaller limit. But this will cause a distortion in color for the overly bright spots, which doesn't look good. To solve this problem, the compiler now preserves color when reducing the brightness. And the brightness is now reduced to 188, not 255, so that it is also below the limit of Goldsrc engine and will not be clipped in game.
You can locate overly bright spots with hlrad parameter '-drawoverload'. Note that there are two cases where this feature will fail to work One is when two bright spots overlap and they are in different light styles.One is when the 'style' or 'custom appearance' of the light entity make the light too strong.Also, if the 'brightness' in game is too high and higher than 1.0 (which is the default brightness and the middle of the brightness slider), the engine will clip the brightness again.
-drawnudge : tool command that show borders of smoothed edges.
-deleteembeddedlightmaps : Ripent command that removes additional textures created by compiler in certain situations.
-texlightgap # : pushes light from texture lights by specified units value, what removes "light bleeding" problem.
 You can check all compile commands (Vluzacn's) here: Light Compile Commands Reference.
Batch file for custom compiling*
*NOTE: in Sven Co-op batch file is no longer required to set compile parameters. All parameters can be specified through point entity: info_compile_parameters.
Tutorial suggested by 'TrEmPlEr'.
Using editor is not the only way to compile your map. Maybe you want to have simple single file to compile map by clicking it, or just save all parameters into single file? This can be done very quickly and easily!
1. Create new .txt file. Place it in the same folder with all compile tools you gonna use (keep in mind that there is normal
and x64 version of each compiler). Also put a map you wish to compile into that folder. It must be in .map format.
2. Open .txt file, and put there four commands:
hlcsg.exe mymap
hlbsp.exe mymap hlvis.exe mymap hlrad.exe mymap
Don't include file .map extension in the command parameters. Convert .txt file to .bat. This file is now executable.
3. Your map is ready for compiling! Run this file, if everything works fine the final .bsp file should be generated.
The log file is automatically created, under yourmap.txt file. You can add all compile parameters to created file.
Here is example of .bat file used by Trempler- one of the level designers in Sven Co-op (feel free to use it):
hlcsg.exe mymap -threads 4 -texdata 90000 -cliptype simple -estimate -chart -nowadtextures hlbsp.exe mymap -threads 4 -texdata 90000 -estimate -chart hlvis.exe mymap -threads 4 -texdata 90000 -estimate -chart -low -full hlrad.exe mymap -threads 4 -texdata 90000 -estimate -chart -extra -dscale 1.5 -fade 1 -minlight 1 -scale 0.8 -smooth 90 -low -bounce 12 -blur 1.5
As you can see, adding commands is very simple, very similar to adding commands in level editor.
Be careful with -threads option, using more cores might make your system unusable during process.
You can also check amazing batch file created by Puchi here: https://gitlab.com/Puchi/Level_Design/blob/master/compile.bat
ZHLT keyvalues
Some entities shares keyvalues, you might find flags like Render Mode or Render FX in most brush entities and some point entities. The same situation is with ZHLT flags. You can config light receiving for brush entities, and light produced by 'light_' entities. Many of keyvalues described below uses similar effects to compile commands for hlRAD.exe.
1. Light Origin: Entity always takes light from it's center. Only one light calculations are made for this entity, no matter if this entity is movable or not. Trains, pushables, doors, buttons, rotatings, tracktrains- they does not receive lights dynamically- so If func_pushable starts under the wall in dark corner, textures of that pushable stays blackout no matter when we transport it. The issue may looks like this:
But don't worry, there is simple and easy fix for this! We gonna use light origin target keyvalue. Firstly, we need to know from which location our entity will be picked light from. Place info_target entity on the map, and then set it's location of your wish.
The location of this entity will be used by func_pushable (or any other entity with issue). Name that info_target, and write it's name into light origin target of func_pushable. The location of info_target is not always easy to set. You will need to choose
it smart, so entity will look more realistic. The info_target is hardest to set on entities that can travel long distance e.g. func_tracktrain where path for this entity is long, and lightning in each area it pass through differs. You can also make another room with lighting specially tuned for this entity, and place info_target there.
Final result:
You can also use custom light origin for model-based entities with zhlt_copylight flag.
2. Minimal Light Level: Not really a ZHLT value, but also very helpful. Used to set maximum lightning level for entities.
Imagine a computer screen in the darkness, machine diodes or just a lamp that produces a light and need to be full-lit.
Use minimum light level key to do this. It's only supports two states: '0' (normal light) and more than '0' (full bright).
Set it to '1' or any other value to make brush full-lit.
Here you can check some examples:
Keep in mind that it does not produce light itself (in the first image I added light by myself).
In the second example I created two brushes- first covered with "NULL" textures in every surface instead of front (where the screen texture is), and the second with the same sizes as the first one, it's textured on sides and back, but there is "NULL" texture on front. First brush (that represent screen) have it's minimum light level set to '1'. The brushes are placed in the same position. This makes only screen texture (first brush) to be full brightened, but sides are in normal brightness (second brush).
The third brush using "Additive" render mode (see Render Modes for more info), "NULL" textures and minimum light level.
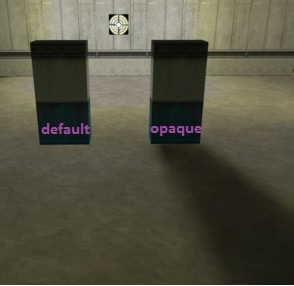
3. ZHLT Lightflags: Changes light casting or receiving setting. The most useful function is 'Opaque' that let you set if that entity blocks light or don't. ZHLT Lightflags contains values:
- Default: let the entity decide about light settings.
- Embedded Fix: disables bleed fix on given entity. Sometimes when entity gets trough the wall, it may get wrong lighting in one of the site. Use this flag when this problem appear.
- Opaque (blocks light): may be useful for func_door or func_illusionary:
'Opaque' function can also generate shadows on transparent "{" textures with 'Solid' Render Mode (amount: 255).
- Opaque + Embedded Fix: Both Opaque and Embedded Fix settings.
- Opaque + Concave Fix: Instead of using Embedded Fix you can use Concave Fix. It's generally used for curved entities, use
it when you spot a black seems on curved (arched) entities.
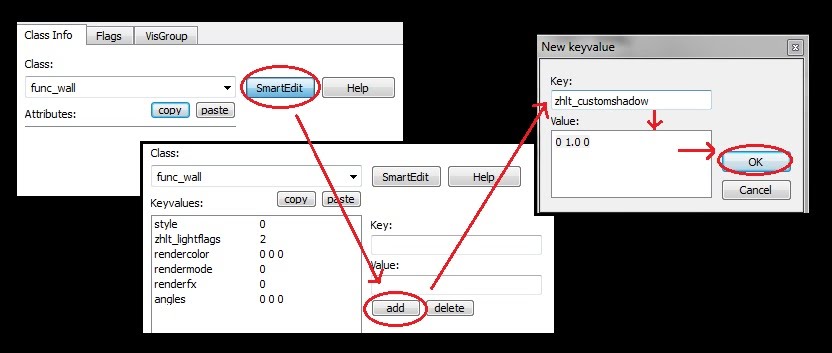
4. Shadow color and intensity: You can add 'zhlt_customshadow' keyvalue to define custom shadow color or transparency
of 'Opaque' entities. Use one value (from 0.0 to 1.0) to change shadow intensity, or three values (each from 0.0 to 1.0) for color.  This keyvalue is not listed in entity keyvalues list, You need to disable smart edit mode and add key 'zhlt_customshadow' manually:
5. Disable collision of any entity: Making custom key 'zhlt_noclip' for brush entity, with value more than 0 makes entity have
it's collision disabled. Note that this can disable touch, direct and bullet collision detection, making func_breakable unbreakable by standard bullet attacks, or func_pushable unpushable. Add custom key like it's described on image above.
6. Making any entity invisible: Use it in the same way as key above. Add 'zhlt_invisible' to brush entity to non-empty value,
and this entity becomes invisible. Note that it's easier to use "NULL" texture to achieve same effect.
7. Changing light, light_spot and light_environment fading: This is local keyvalue that controls light travel distance. You can either make light shorter or longer. Set it by changing zhlt_fade. The default value is 1.0. 
8. Changing light, light_spot and light_environment falloff method: zhlt_falloff overrides lightning spreading method.
Brush Collision
List of different entities blocking/solidity removing methods.
| Block Player and Monster, don't block bullets nor model projectiles. | Brush with "CLIP" texture. | | Block bullets and model projectiles only. | Passable Func_detail with "NULL" texture. | | Block everything. | Brush or func_ with "NULL" texture. | | Block selected monsters only. | Func_monsterclip entity, monsters with monster clip. | | Block (flags) player, monster, pushables, items, others. | Func_clip entity. | | Removes brush collision. | "SKIP" texture on any surface. | | Removes brush collision, does not split intersecting brushes. | "SKIP" + "NULL" (recommended) or "SKIP" + "HINT" |
Global Lightning Appearance
How to disable or change appearance of all unnamed light on map. Additionally toggles targeted light on and off.
1. Place global_light_control on your map. Name it, entity must be triggered in order to toggle lights.
2. For unnamed lights change custom appearance.
Custom appearance is a string value, from 1 character up to maximum 64 characters. Specify the alphabet letters from 'a' (complete black) to 'z' (full bright) e.g. 'aaaabcddefggghijklmnoooopqpooooooonmlkjihgggfeddcbaaaa' for pulsing light
or 'z' for no light or 'zzzzzzzzzzaaaaaaaaaa' for strobe e.t.c.
3. It's possible to turn named light on and off by specifying name of those lights in a target field.
Advanced Texlights
Info_texlights allow you to create texture lightning in a simple way, but it's not supporting triggering (on/off), appearance
or light type (light/light_spot). Light_surface resolves that problem, allowing you to change almost every aspect of texture light, includes applying texlight on given entity only or within the radius.
1. Place light_surface on your map. Give it a name for further triggering if required (to run light off/on in-game).
2. Customize keyvalues to set up your light:
name --> name of this light_surface entity. Required if you want to toggle light on/off by triggering it.
texture name --> name of texture to apply light on, e.g. "+0~LIGHT4A".
filter max distance --> if you specify a value here, this is the radius in which light_surface will search for textures (basing on texture centers).
filter max distance to plane --> same as above, but includes whole texture in a search, not only their center.
filter entity classname --> only textures applied on entities with chosen classname (e.g. func_wall) will be emitting light.
filter entity name --> only textures applied on entities with chosen targetname will be emitting light.
texture brightness --> brightness of texture (note that this is not the same as brightness of info_texlight, where you need to multiply brightness value based on texture size. Treat is like light entities brightness.
inner/outer angle --> if used, the light turns into light_spot. Those values works then like those in light_spot entity.
adjust emit scale --> scale of spotlight when inner/outer angles are used.
grid size of sampling --> scale of sampling grid, used for scaled textures (in editor) to get better quality shadows.
fast --> set it to 'Yes' for large faces with low brightness.
color --> color of the light. If not used, the compiler generates color based on texture color.
(custom)appearance --> color appearance to set for that texture, works in the same way as in normal light entities.
3. Only last think- you can set initially dark flag so the light is turned off by default. Trigger light_surface in-game
to turn it on. You can also revert the process (start on, trigger to turn off) and toggle light freely whenever it's fired.
Remember to give this light_surface a name when you want to turn it on or off.
Multiple and Switchable light_environments
It's possible to put multiple light_environments on map, with appropriate commands you can disable global light_environment, so it's possible to make them work in the same way as regular light. Light_environment is triggerable, to we can disable and enable it whenever we want to.
First section tells how to make multiple light_environment for separated areas.
Second section describes how to use multiple light_environment, but for one area, and then how to switch between them.
1. Multiple Light Environments: place light_environments on your map. To disable global light_environments support, you need to enable '-noskyfix' for hlRAD. Now you can use more than one light _environment to make it produce different light each separated area with sky, for both entities and models (info_sunlight is not required).
2. Switchable Light Environments: Decide which light you want to be enabled at start, and which one to be disabled.
'-noskyfix' command must be disabled (just make sure it's not in the hlRAD compile command parameters).
I'm using three light_environment entities for this example:
- le_day (will be enabled at map start)
- le_sunset (disabled at start)
- le_night (disable at start)
The goal is to create func_button, when activated, another 'time of the day' will be used:
It's day -->Button Pressed<-- It's sunset -->Button Pressed<-- it's night -->Button Pressed<-- It's day e.t.c.
2.1 Firstly, we need to disable le_sunset and le_night at map start. To do this, place two trigger_auto on map,
one of triggers must have 'le_sunset' on it's target field, the second one 'le_night'. Both of triggers must set their
trigger state to 'Off' (as it is by default).
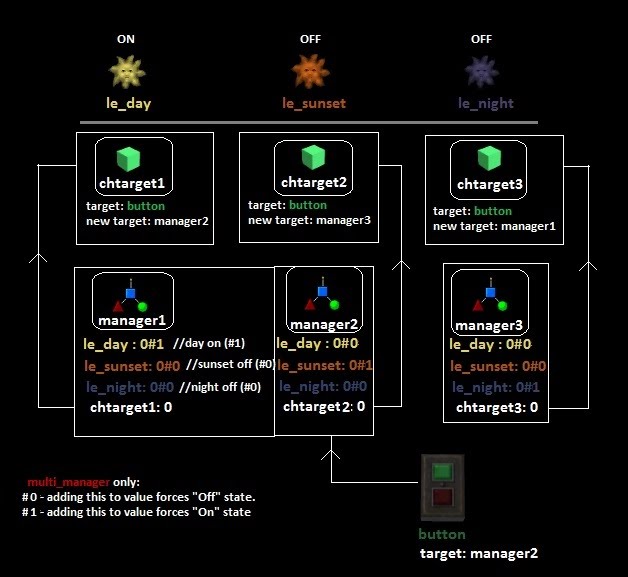
2.2 Now we need to create one func_button, three trigger_changetargets and three multi_managers. The buttons triggers multi_managers which triggers equivalent light_environment, and a trigger_changetarget that changes button's target
to another multi_manager. The whole event is a little complicated so the image below should explain this:
Mirror Floor Trick
Sven Co-op does not support mirrors of any kind, but it's possible to duplicate flip a room to create effect that look like mirror. This effect can be seen in Half-Life Blue Shift:
1. Firstly, create the whole room. Place all lights and brush entities, furnitures and details. You can also place monsters,
but you need to know few thinks about mirror trick:
- You need two monster entities for each monster- one for normal monster, and another for reflection.
- It's better when monsters won't go into interaction with player, so they cannot be talked to, blocked, used e.t.c.
- They need to be assigned to scripted_sequence with no interruptions, so they won't get detached from their reflection.
- For monsters that players can interact with you can decide to not render their reflection.
- Players can't be mirrored in any way.
- Decals (blood splatters, bullet holes e.t.c.) won't be mirrored.
- Dropped weapons and items can't be mirrored as well.
- Rotating entities that rotates around X or Y axis need to have their reverse direction flag selected in mirrored room.
2. (If using monsters) place monsters (e.g. monster_scientist) and scripted_sequences entities, customize properties of entity, example:
 3. Time to flip the whole room! Select everything except scripted sequences, floor and player starts:
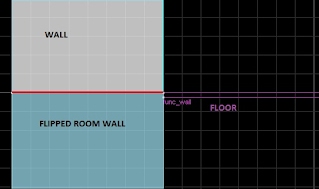
Then copy and paste this room, go into Tools-->Flip object-->Vertically, and the whole room gets flipped. Now connect
two rooms so walls of the first and second (mirrored) room will be touching, preventing leak error to generate:
Now turn floor into func_wall and give it 'Texture' render mode with fX amount of your choice. Duplicate scripted_sequences and change name of mirrored monsters. Make new scripted_sequence target monster keyvalue set to mirrored monsters names.
The placement of scripted_sequence might be a little bit tricky. You need considering angles of scripted_sequence for some animations, and offsets for mirrored sequence.
Origin of monster animation and scripted_sequence must be in the same spot in editor, so the animation will be rendered properly, just as we planned. Then mirrored animation need to have it's angles set dependently to normal animation:

The example above shows 'sit1' animation of monster_barney. When we flip the monster and scripted_sequence upside down
we will need to reorient scripted_sequence position, and change it's angles (e.g. from '45 to '135 when used example above,
and the scripted_sequence angle is '45 for normal model). But for animations like 'idle' you would see that origin
of scripted_sequence, as well as monster's 'idle' animation have their origin in a same spot, even after flipping scientist upside down. That's because it's on monster's feet position, so when we rotate monster the feet will be still touching the floor,
so scripted_sequence for mirrored monster would have exactly the same position as sequence of original monster.
Toggleable Shadows and Light Bouncing on Opaque Entities
When toggling opaque entities with 'Opaque' value in ZHLT Lightflag key, the shadow does not disappearing/appearing right.
Hopefully there is easy fix for this. Note that switching shadows won't work on multiple and switchable light_environments exterior areas (but single light_environment is supported).

1. Place light_shadow and light_bounce on map. The second entity extends light_shadow functionality and it's optional.
However it's recommended to use both for best visual results. Name entity that will be toggled on or off (e.g. func_wall_toggle)
and give the same name for light_shadow and light_bounce. Additionally, set target solid entity to the same name as all those entities have. The location of light_shadow and light_bounce does not matter.
2. If opaque entity is visible at start, enable initially dark flag in light_bounce properties. If it's invisible at start, this flag must be selected for light_shadow instead. The point is, when light_shadow is enabled, the light_bounce must be disabled, and vice versa.
3. Triggering all those three entities (they have the same name) makes all cast shadows and bounced lights to be toggled
as well. You can also name all those entities differently and trigger them separately if needed (specially when killing brush entities instead of toggling them on trigger).
Light Smoothing Control on Specified Texture
You can change smoothing value for chosen textures, works just like '-smooth' console command parameter for hlRad.
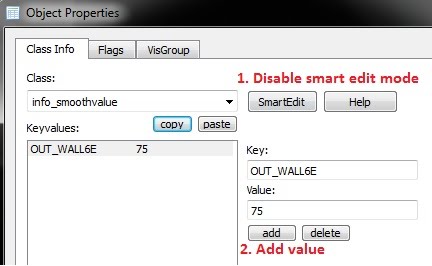
1. Place info_smoothvalue on your map. The location of this entity does not matter. Go into properties of this entity, disable smart edit mode, add a keyvalue where key is name of texture to use and the value is a smoothing value factor for this texture.
Default smoothing value is '50' for all textures on the map. Check '-smooth' command parameter in this page for more info about smoothing value.
Shadow Spreading in Exterior Areas
You can control shadows of light_environment. It's useful when you want to add more realistic shadows depends on light type-for sunny day shadows will be sharper, when for cloudy or rainy weather more blurred.
1. Go into properties of light_environment, add new custom key '_spread' by disabling smart edit mode (like in image above).
Specify a value for this key- is a light blurring (spreading) value:

Visual results may differ dependently on light_environment settings, compile command parameters and textures scale.
Brightness of Transparent Textures
Customize brightness of transparent textures like glass, which are not rendered properly by default.
1. Go into properties of transparent entity, disable smart edit mode and add two new keyvalues:
- 'zhlt_embedlightmap' with a value of '1'.
- 'zhlt_embedlightmapresolution' with a value of 2 or 4 or 8 e.t.c. (default is 1, recommended is 4).
First keyvalue creates fake lightmap on transparent textures (for this entity), what makes those textures looks more natural and fits the environment:

Second keyvalue is for optimization- scales lightmap size to decrease memory usage significantly (highly recommended).
Translucent Effect
Another Vluzacn's trick allows to apply translucent effect on specified textures.
1. Create brush or brushes that will receive light from each site. Those brushes must not be ticker that two units, and they need to be part of world (they cannot be turned into brush entities).
2. Place info_translucent entity on your map. Disable smart edit mode and add new keyvalue(s), where key is a name of texture
to simulate translucency, and the value is a light receiving amount from 100% receiving on front '0.0' to 100% receiving
on back '1.0', and where value of '0.5' means receive on back and front equally. Here is my example:

Brush receives light from the other side of room, what gives nice effect- in a blue room brush receives light from red room,
and in the red room brush receives light from blue room. This effect can be useful in some situation. Imagine a house at the night- the lights in a room is turned on, and we can tell that from the outside of the house because windows are translucent, and those windows receives the light from inside of the building. The same effect we would see inside this house- the room
is well-lit, but it's dark outside of the building, what we can see when looking at the window. Use it on plastic, dirty glass, fabric e.t.c.
Decrease Light Fading Ratio on Textures
Select a textures to give them an effect similar to one which is provided by '-fade' command parameter in hlRad.
1. Place info_angularfade on your map, and using the smart edit mode add new keyvalues, where key is a name of texture
to apply effect, and the values is a fade ratio, where 1.0 is default fade.
This may be removed in future Vluzacn's Compile Tools release.
Custom Lightning for Models
Customize lightning of models (.mdl) on your map by using new tool texture. This is similar to texture lightning, but affects only models. Or just copy lightning data from another entity.
Method 1: Place info_texlights on your map, and using the smart edit mode add new 'BLACK_HIDDEN' key, and a value of custom light color and brightness, in a format: 255 255 128 2000 (red, green, blue and brightness). This work in the same way as other texture lightning, but it will produce a light over all 'BLACK_HIDDEN' brushes, to affect models only. From now, every model's origin placed ABOVE brush completely covered with 'BLACK_HIDDEN' texture receives light specified in info_texlight.
It's recommended to turn this brush into func_detail, and texture all it's faces except top with 'SKIP' textures, to disable it's collision. Note that this will affect all models that appear above this brush entity, even monsters and players.

If you don't know how to set up info_texlights entity, check last section in light tutorial here.
Method 2: Much simpler method includes usage of zhlt_copylight keyvalue. Add this keyvalue by disabling smart-edit mode
and clicking on "add" button, type zhlt_copylight in the key field, and name of the other model-based entity in the value field.
This will copy lightning data from target entity. You can also use info_target as target entity.
Priority of Overlapping Faces
Now it's possible to define texture render priority when two detail brushes overlapping each other.
1. Select two brushes that overlapping each other, turn them into func_detail, and make sure that detail level is the same
in both of those entities.
2. Change priority when faces overlap to the value of you choice- different in each func_detail brush. Higher priority makes brush faces to be rendered first:

You can also mix detail brush faces with world brush faces by changing detail level to '0', and then using priority when faces overlap. That makes detail brushes to be rendered first (over world brushes), just like decals does:

Overview Point
Overview point is used when you want to host your map and create an overview image of the whole map. It's even more useful for Counter Strike mappers who need overview maps for their levels, an this allows them to create it with ease.
1. Create a room from which you want your whole map to be visible. Use 'NULL' texture for walls they will be invisible from the inside of the room.
2. Place info_overview_point inside that room. From now, all visleafs are visible from this room. You can take a screenshot
of you map. Press ESCAPE twice to clear the image from unwanted rendering issues (which persist when looking outside
the world).
|
